

By Jen Malone
I know there are many other places on the fancy schmancy intrawebz to get this information, but I’m not so sure the message is being received. As a freelance editor most of the manuscripts emailed to me are not formatted in standard industry format. I don’t really care BUT this makes me worry that agents receiving these same manuscripts might be forming biased opinions about a writer’s professionalism before even beginning a read.
First impressions are first impressions, so why not start off with a favorable one.
Here’s how to format so you look like a seasoned pro who has done your homework!
First things first. Your manuscript should be saved as “TITLE Last Name” so that it’s easily searchable when an agent needs to locate it on his/her Kindle. The title should be in all caps and your last name does not need to be. You could also indicate “partial” or “full” in the document name if that applies. Please, please, do not label “TITLE version 4768” or “TITLE draft 2013”. You may have been polishing your ms for years, but I’m not sure you want to share that information at this point in the process. If you are using Microsoft Word, save the file as a .doc as opposed to .docx as not all agents can open the newer docx format.

Next, your document should begin with a cover sheet that looks like the picture below. For the sake of your career, take five minutes and set up a professionally-named email account to use so that your cover sheet does not include MomofTwelve@crazytown.com or “Shmoopylovecakes@glitter.com. The bottom half of this sheet will be blank. A final note on this: round your word count up or down to the nearest 1,000.

The next page is where your manuscript begins. First things first, include a header on every page for agents who like to print out submissions, so if the pages get swept up in a windstorm the agent will instantly know who wrote this brilliant thing they’re reading and how to put it back in order! Include your title, name, and contact information in the header. You should also include page numbers in the opposite top corner or on the bottom of each page.
You do not need to format your manuscript to look like a printed book (I actually did this–complete with cover art–when I sent my ms to my very first reader and she very politely and with a straight face, suggested I, um, reformat ASAP!) This is not yet a book, it is a manuscript, so there is no need to drop your chapter beginnings to mid-page or include photos you envision enlivening your text (If it helps you feel like you’ve written a novel versus a term paper, by all means save a copy like this that you can revel in! But send the agents the one that looks like a boring dissertation and let your words do the impressing instead.)
It should look something like this:
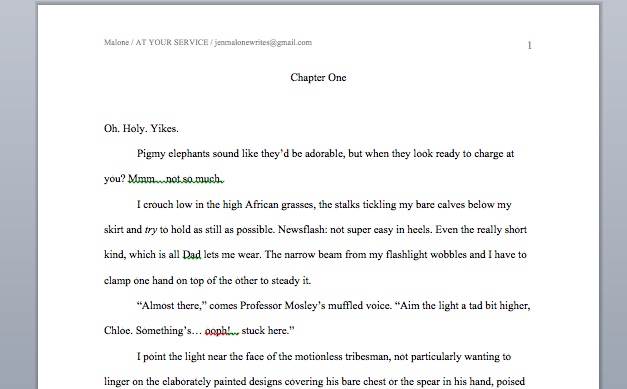
Note above that I used a standard font (Times New Roman and Courier are the two most requested by agents) and size (12-point) for all text (you can go to 24-point for the title on your cover page but otherwise 12, 12, 12! All text should be double-spaced..
Next, go grab a published book off your shelf.
Trust me on this.
Open to the first page of any chapter and peek at the first line. It’s not indented. I know, I KNOW. You never noticed this before, in all your years of reading. Your mind is blown! But it’s true: The first sentence of chapter openings and of scene breaks are NOT indented. If you follow my instructions below, you will be formatting your text to automatically indent each paragraph so this is something you’ll need to fix manually when you’re done writing.
Speaking of indenting. You’ll want to format your ms so that you do not hit the tab bar even once in the document. You also do not want to hit the space bar five times with each new paragraph. But why, Jen? It all looks the same on the page. Yes. Yes, it does. But, fates willing, when this sells in a giant multi-book deal it won’t to the person at the big, fancy publishing house formatting your manuscript into a book. And, more importantly at this stage, it won’t on an ereader, where it is extremely likely your book will be read by a requesting agent.
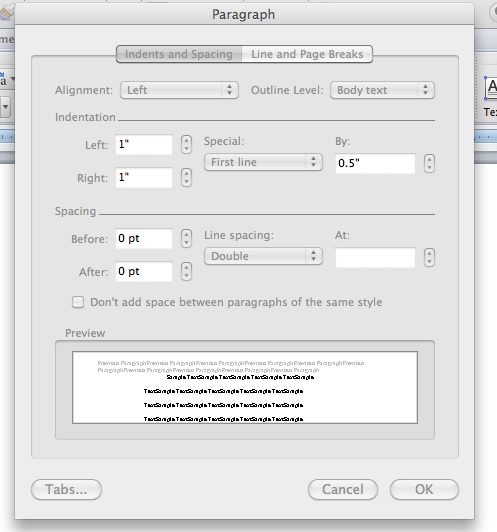
Instead (for Microsoft Word), along the top menu bar, go to Format and select Paragraph. Then fill out the form as follows with regard to margins, spacing, and indentation. This will set up your document so that when you hit the return key, the cursor will automatically indent five spaces for the start of the new paragraph.
You know how I mentioned above not hitting that space bar five times? You also don’t want to hit it twice. If you’re anything like me, you learned there were two spaces between sentences. Not no more! Now there is only one. If you can train yourself to write this way, you are golden. if you’re like me and just can’t get your brain to compute when you’re busy typing alllllll the words as fast as they form in your head, you can fix this at the very end. You’ll want to do a “Find and Replace”. Where you would ordinarily type a word for your computer to search for, you’re going to hit the space bar twice. Then go to the next line (replace) and hit the space bar once. Then hit enter. I would show you a pretty picture of this, but, well, it’s all kind of invisible. But it does work, I promise!
At the end of each chapter, select “Insert Page Break” from the Insert section along the top menu bar, rather than hitting return until you reach a blank page. As you revise, this will preserve your chapter breaks for you.
Finally, after the very last line of your ms, center a row of several ##### signs to let the reader know they’ve reached THE END!
On that note:
#########
(And happy formatting! Got questions? Leave them below!)
Related content on Writers’ Rumpus:
S.O.S., Sending Out Submissions, by Heather Fenton
How NOT to Format Your Manuscript, by Marianne Knowles

I don’t usually add my last name to the title when saving a document; makes great sense though for easy searching. Thanks for the good tip!
LikeLike
Thanks, Marcia!
LikeLike
I so did not know that about tabs to indent paragraphs. I am the queen of the tab key! Now, of course, I’m madly brainstorming on how to fix this in an almost-finished ms. ACK!!!
LikeLike
I haven’t tried this, but I’m told you can use Find and Replace (Ctrl+f) to delete all your tabs by using ^t in MS Word. Worth a try!
LikeLike
Yes, you can use find and replace to replace tab characters. Open up the “Find & Replace” box and click on the “more” button (this toggles between “more” and “less”). At the bottom of the expanded box, click on “Special” for a menu of special characters. Select the special character of your choice for the “Find” box and replace it with no character (i.e. nothing in the “replace” box) to delete it. If “replacing all” messes things up, hit “undo” and replace the characters one at a time. Good luck!
LikeLike
Thank you!! I just used the find and replace technique to fix my tabs & it found 683 occurrences. That would have been a painful process to complete one at a time!
LikeLike
Great post! Thanks for sharing. And Ctrl + E also helps with page breaks 🙂
LikeLike
Great tip- thanks for including!!!
LikeLike
Thanks for the great post, Jen. When I actually get around to writing a ms that is longer than 500 words, I will definitely be using your post as a reminder!
LikeLike
Thanks Jen, I learned a lot from your post…and when I get around to actually writing a ms that is longer than 500 words, I’ll know where to go for formatting help!
LikeLike
Oh my gosh, Jen. I thought I had this, but I didn’t! You just saved me a goatload of headaches.
LikeLike
A goatload you say? Can’t have that:)
LikeLike
Thanks for this great information! I had absolutely no clue that I wasn’t supposed to indent the first line of a new chapter!
LikeLike
It’s one of those ‘seeing is believing’ things because I never registered this as a reader.
LikeLike
Jen, you’ve done a fantastic service for writers near and far. In my day job in K-12 educational publishing, I’m sometimes in a position to hire freelancer writers and editors. If I’m evaluating someone new, the first thing I do is turn on the formatting in a Word file they’ve submitted–you know, that paragraph-mark button on the Home tab? It reveals ALL! If I see tabs or multiple spaces being used to indent a paragraph, or worse, to format columns or tables, I politely decline to hire that person, not because I’m unforgiving but because I’m not being paid to train them in using a professional tool, nor to tidy up after them. (Exceptions made for authors under royalty contract, of course, but in K-12 they have other qualifications that make training them in Word worthwhile.)
I do, however, ignore double spaces between words and spaces before paragraph breaks (another no-no for e-files that are going to press–I can’t speak for e-reader files). As you point out, even people who are fluent in Word create those, and they are very easy to clean up using find & replace.
LikeLike
That’s both interesting and scary to hear! Thanks for the perspective from the other side of the desk, Marianne.
LikeLike
GREAT post! Thanks for digging into this. You’d think this information is everywhere, but I’m still learning new things. I never knew tabs were such an issue! 🙂
LikeLike
Neither did I until I looked at my work on an e-reader- which, if you have one, is always a good thing to do before hitting send on a full request! An agent certainly won’t reject you because of tabs, but why have them focusing on (and getting cranky over) technical issues when you’d prefer them to focus on your writing! Thanks for reading!
LikeLike